| Узбекистан, Бухара, Бухарский институт высоких технологий, 2013 |
Configuring the local network
In "Networks and the Internet" we looked at the basic concepts surrounding BSD networking. In this chapter and the following two, we’ll look at what we need to do to configure a network, first manually, then automatically. Configuring PPP is still a whole lot more difficult than configuring an Ethernet, and they require more prerequisites, so we’ll dedicate "Configuring PPP" , to that issue.
In this chapter, we’ll first look at example.org in the reference network on page 294, since it’s the easiest to set up. After that, we’ll look at what additional information is needed to configure machines on example.net.
Network configuration with sysinstall
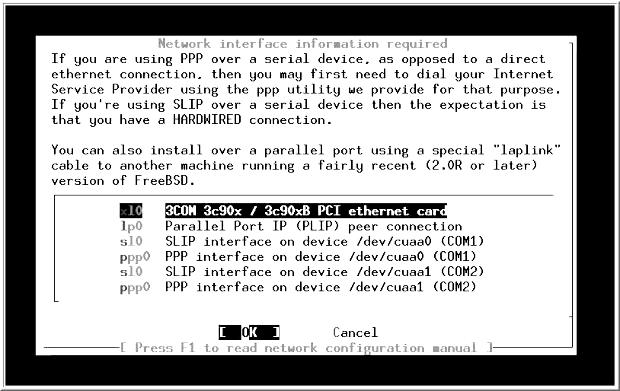
To configure a network, you must describe its configuration to the system. The system initialization routines that we discussed on page 528 include a significant portion that sets up the network environment. In addition, the system contains a number of standard IP configuration files that define your system’s view of the network. If you didn’t configure the network when you installed your system, you can still do it now. Log in as root and start sysinstall. Select the Index, then Network Interfaces. You will see the menu of Figure 17-1 , which is the same as in Figure 6-4 on page 97. On a standard 80x25 display it requires scrolling to see the entire menu. The only real network board on this list is xl0, the Ethernet board. The others are standard hardware that can also be used as network interfaces.
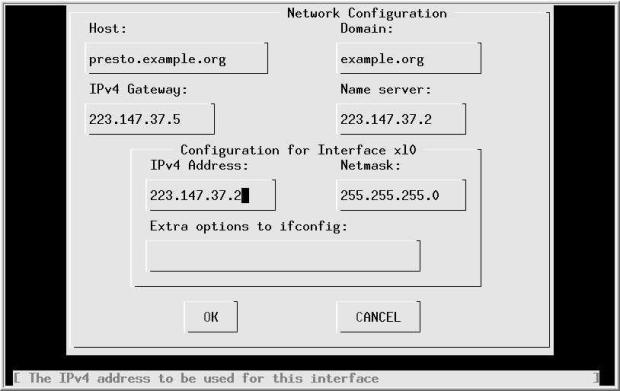
Choose the Ethernet board, xl0 You get a question about whether you want to use IPv6 configuration. In this book we doesn’t d discuss IPv6, so answer No. Next you get a question about DHCP configuration. We discuss DHCP configuration on page 302. If you already have a DHCP server set up, you may prefer to answer yes to this question, which is all you need to do. If you answer No, the next menu asks us to set the internet parameters. Figure 17-2 shows the network configuration menu after filling in the values.
Specify the fully qualified local host name. When you tab to the Domain: field, the domain is filled in automatically. We have chosen to call this machine presto, and the domain is example.org. In other words, the full name of the machine is presto.example.org. Its IP address is 223.147.37.2. In this configuration, all access to the outside world goes via gw.example.org, which has the IP address 223.147.37.5. The name server is located on the same host, presto.example.org. If the name server isn’t running when this information is needed, we must specify all addresses in numeric form, as shown.
What happens if you don’t have a domain name? If you’re connecting to the global Internet, you should go out and get one-see page 318. But in the meantime, don’t fake it. Just leave the fields empty. If you’re not connecting to the Internet, of course, it doesn’t make much difference what name you choose.
As is usual for a class C network, the net mask is 255.255.255.0. You don’t need to fill in this information—if you leave this field without filling it in, sysinstall inserts it for you. Normally, as in this case, you wouldn’t need any additional options to ifconfig
sysinstall saves configuration information in /etc/rc.conf. When the system starts the startup scripts use this information to configure the network. It also optionally starts the interface immediately. In the next section we’ll look at the commands it uses to perform this function.
Manual network configuration
Usually FreeBSD configures your network automatically when it boots. To do so, it uses the configuration files in/etc. So why do it manually? There are several reasons:
- It makes it easier to create and maintain the configuration files if you know what’s going on behind the scenes.
- It makes it easier to modify something "on the fly" you don’t have to reboot just because you have changed your network configuration.
- With this information, you can edit the configuration files directly rather than use the menu interface, which saves a lot of time.
In this section, we’ll look at the manual way to do things first, and then we’ll see how to put it in the configuration files so that it gets done automatically next time. You can find a summary of the configuration files and their contents on page 551.
Describing your network
We saw that systems connect to networks via network interfaces. The kernel detects the interfaces automatically when it starts, but you still need to tell it what interfaces are connected to which networks, and even more importantly, which address your system has on each network. In addition, if the network is a broadcast network, such as an Ethernet, you need to specify a range of addresses that can be reached directly on that network, network mask.
Ethernet interfaces
Once we have understood these concepts, it’s relatively simple to use the ifconfig program to set them. For example, for the Ethernet interface on system gw, with IP address 223.147.37.5, we need to configure interface dcO. The network mask is the standard value for a class C network, 255.255.255.0. That’sall we need to know:
# ifconfig dc0 inet 223.147.37.5 net mask 255.255.255.0 up
In fact, this is more than you usually need. The inet tells the interface to use Internet protocol Version 4 (the default), and up tells it to bring it up (which it does anyway). In addition, this is a class C network address, so the net mask defaults to 255.255.255.0. As a result, you can abbreviate this to:
# ifconfig dc0 223.147.37.5
Note that this is different from what Linux requires. With Linux you must supply explicit net mask and broadcast address specifications.
As we saw on page 290, it has become typical to abbreviate net masks to the character / followed by the number of 1 bits set in the network mask. ifconfig understands this usage, so if you wanted to set a non-standard network mask of, say, 255.255.255.240, which has 28 bits set, you could write:
# ifconfig dc0 223.147.37.5/28


